Best Ways to Compress JPEG Images Without Losing Quality (2026 Guide)
JPEG is the most widely used image format across the web. Around 72% of all websites rely on JPEG, and usage rises to over 74% among top-ranking websites.
But what if you get stuck because of a large JPEG file size. That’d be frustrating, no?
Upload limits block submissions, email attachments are rejected, and slow-loading JPEG images affect performance.
So, what options do you have right now?
You can use automated compression, resize dimensions, adjust compression levels, crop unnecessary areas, or switch formats. But each compression method changes how image data is handled. Can you choose the right method on your own?
Let us help you.
Rest assured, the best ways to compress JPEG images without losing quality are already shortlisted. So, you won’t have to test multiple approaches. Our guide walks you through not only the best methods but also everything you must know.
Key Takeaways
- JPEG compression reduces file size using a controlled lossy process supported by efficient encoding techniques to preserve perceptual detail.
- Quality loss mainly occurs due to aggressive compression settings, lack of adaptive processing, repeated compression cycles, and weak algorithms that fail to preserve perceptual detail
- A reliable image compressor applies balanced compression automatically, analyzes image structure, and provides both slider-based and exact size control for consistent results
- Resizing image dimensions reduces total pixel data, which directly lowers file size without affecting visual clarity for screen-based usage
- Adjusting compression level helps control the balance between size and detail, with 70–80% quality often delivering optimal results
- Cropping unnecessary areas removes excess visual data, which reduces file size while improving focus and composition
- Format conversion provides additional optimization only if alternative formats such as WebP or JPEG are allowed for the specific use-case
- Size-targeted tools help achieve exact file limits such as 20KB, 50KB, or 100KB without repeated adjustments, which simplifies upload-based workflows
- Choosing the right compression method depends on purpose, file size limits, and level of control required
- Maintaining image quality depends on starting with a high-quality source, avoiding repeated compression, and applying controlled optimization with preview validation
What Is JPEG Compression and How Does It Work?
JPEG image compression refers to a method that reduces file size by optimizing how visual data is stored. It makes the image lighter while maintaining visual clarity at a perceptual level.
Notably, JPEG primarily uses a lossy compression approach, where less noticeable visual details are reduced to achieve size reduction. Alongside this, it applies efficient encoding techniques to compress optimized data without additional quality loss.
Let’s consider an example for better understanding.
For instance, you have a 35 MB JPEG image that you need to upload online. However, the file size exceeds the portal’s requirements. So, you upload the image into a compressor to compress JPEG images without losing quality. Here’s how it will go:
- The system analyzes image data by scanning colors, edges, textures, and patterns to identify areas that carry important visual detail.
- The image moves into color processing, where brightness and color components are separated, preserving visual perception while reducing excess color data.
- The system reduces color detail where the human eye is less sensitive, which helps lower file size without affecting perceived clarity.
- The image is divided into small blocks, and a frequency transformation (DCT) is applied to detect which parts carry essential detail and which parts can be simplified. Notably, DCT converts image data into frequency components. All while separating important structure from less noticeable high-frequency detail.
- Quantization reduces high-frequency data such as fine textures and minor variations, which significantly lowers file size while maintaining visual consistency.
- Compression level is applied based on selected quality settings, which control how much data is reduced and how much clarity is preserved, supporting high quality image compression.
- The optimized data is encoded using efficient compression techniques, resulting in a smaller, faster-loading JPEG image ready for use across the web, storage, or sharing.
So, JPEG image compression focuses on reducing less noticeable visual data while preserving perceptual detail. Got it?
Why Does Your JPEG Image Lose Quality During Compression?
It is worth noting that JPEG image quality loss is mainly caused by how compression handles image data during size reduction. JPEG compression simplifies visual information to reduce file size, and the level of control applied during this process directly affects the final output. However, there can be different reasons, such as:
- Aggressive compression settings remove more data than necessary, reducing sharpness and fine detail.
- Low-quality percentage selection increases compression strength, which reduces detail and leads to visible softness.
- Higher compression increases quantization strength, which reduces fine detail and introduces visible artifacts such as blockiness, banding, and ringing.
- Lack of adaptive compression treats all areas equally, which reduces important details along with less noticeable ones.
- Weak compression algorithms fail to prioritize perceptual importance, which affects overall visual clarity.
- Color data reduction lowers precision, which results in banding and uneven gradients.
- Multiple compression cycles compound data loss and cause generation loss over time.
- Low-resolution source images limit optimization flexibility, which introduces artifacts more quickly.
Anyhow, if you want to compress images without losing quality, just make sure that the compression tool is built with intelligent algorithms that analyze image structure, apply adaptive compression, and preserve perceptual details. It ensures balanced optimization, controlled data reduction, and consistent visual clarity across different use cases.
What is the Best Way to Compress JPEG Images Without Losing Quality?
It is always recommended to leverage a reliable tool to compress JPEG images without losing quality. That’s the best way, indeed.
For instance, you can use Imagetotextconverter.net image compressor to shrink JPEG file size online without going through complex settings. The tool is built with advanced algorithms that apply controlled lossy compression with efficient encoding. In fact, image data is analyzed before compression begins, so important visual details are preserved while unnecessary data is reduced.
Now, here’s how you can use our free image compression tool to reduce the file size of any JPEG image.
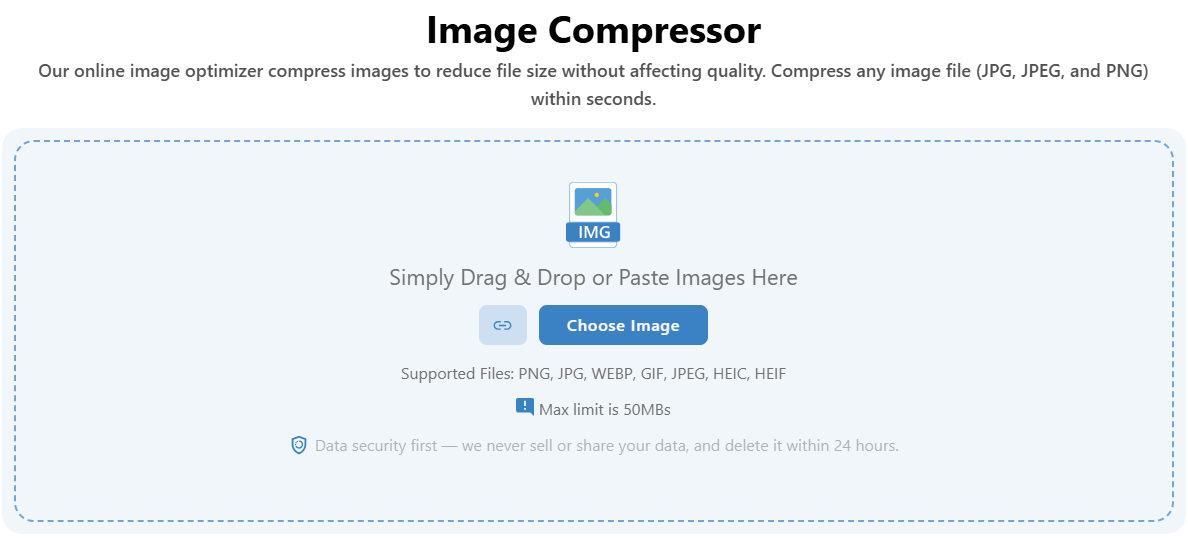
Upload JPEG Image for Compression
Start by uploading your JPEG image into the tool. You can drag and drop the file or select it using the upload option. In fact, you can also add an image URL if required.
As you upload the image, the system automatically prepares it for compression and displays it in the results section.
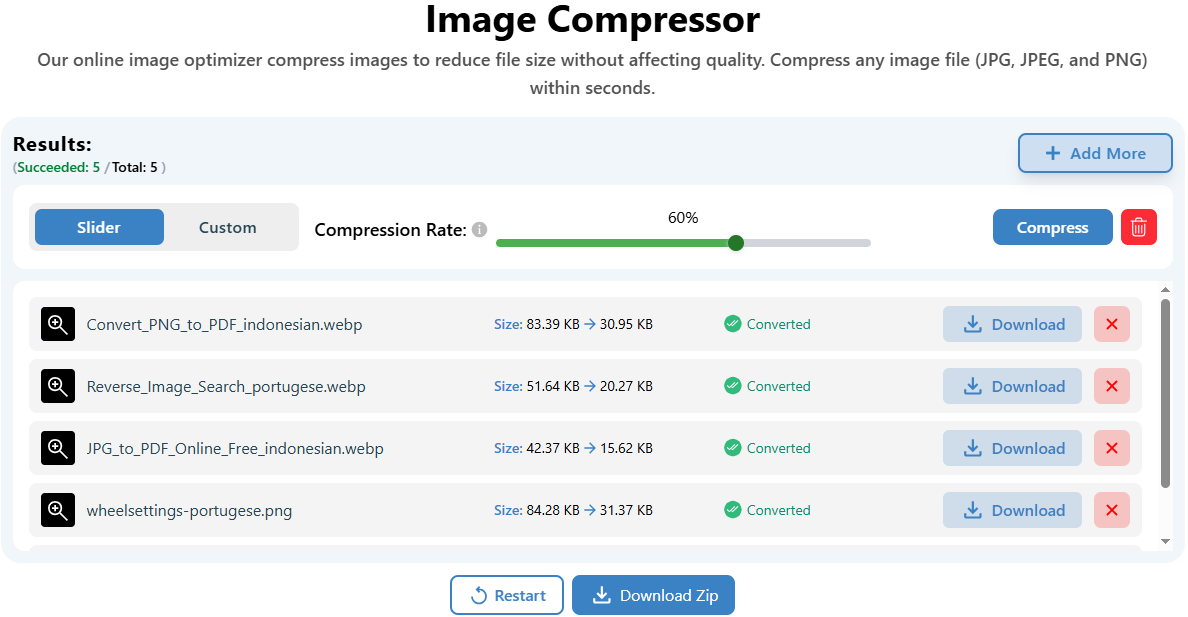
Get Automatic Compression Results with Slider Mode
Once the image is uploaded, compression is automatically set to the slider mode. The slider applies a balanced compression level to compress images without losing quality. It shows the percentage level of compression for your understanding as well.
You can easily slide higher or lower to support high quality image compression as needed. Don’t forget to click on the “Compress” button.
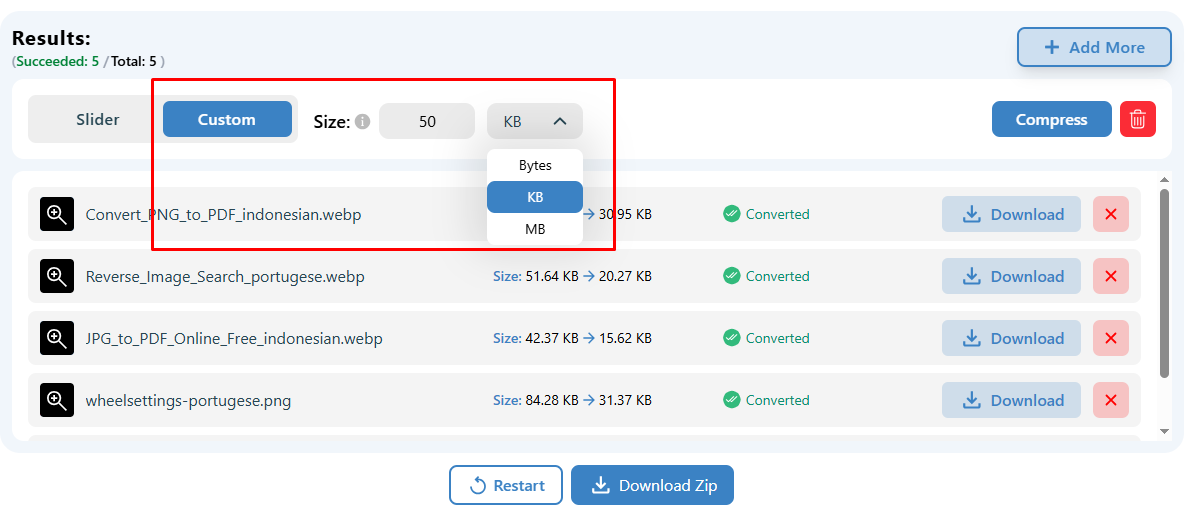
Switch to Custom Mode for Exact Size Control
If you need a specific file size, switch to the custom tab. Enter the required size in KB or MB and run compression again. Yes, we added this functionality only to help you reduce JPEG file size without losing quality based on upload limits or platform requirements.
Click on the “Compress” option to process the image. The system applies the lossy compression method, reducing unnecessary data while preserving visual structure.
Continue with Bulk Processing (If Required)
Select the Add More option to upload additional images and continue compression within the same session. Well, this allows you to process multiple files efficiently without restarting, supporting workflows that require a bulk JPEG compressor capability.
Download Compressed JPEG Image or Export in Bulk
Download the compressed image directly using the Download button next to each processed file. The system shows the reduced file size, so you can confirm optimization before saving.
Or you can simply export multiple images together by clicking the Download Zip option.
Alternative Methods to Reduce JPEG Image Size
In case you’re unable to compress JPEG images using a reliable tool, you can rely on the following alternative methods to reduce overall size.
Resize Image Dimensions (Width & Height)
In case you’re unable to access a reliable free image compression tool, you can simply resize image dimensions to reduce file size. Image size directly depends on the total pixel count. Because a reduction in width and height lowers the number of pixels, which reduces the overall file size.
For instance, a 4000 × 3000 image carries significantly more data compared to a 1920 × 1080 version. So, you can compress images without losing quality in a practical sense, especially for web and screen-based usage.
Notably, you should resize image dimensions in scenarios such as:
- preparing images for websites or blogs
- uploading files to platforms with size limits
- optimizing images for faster loading
- reducing storage usage for large photo collections
Now, follow a simple approach to apply this method:
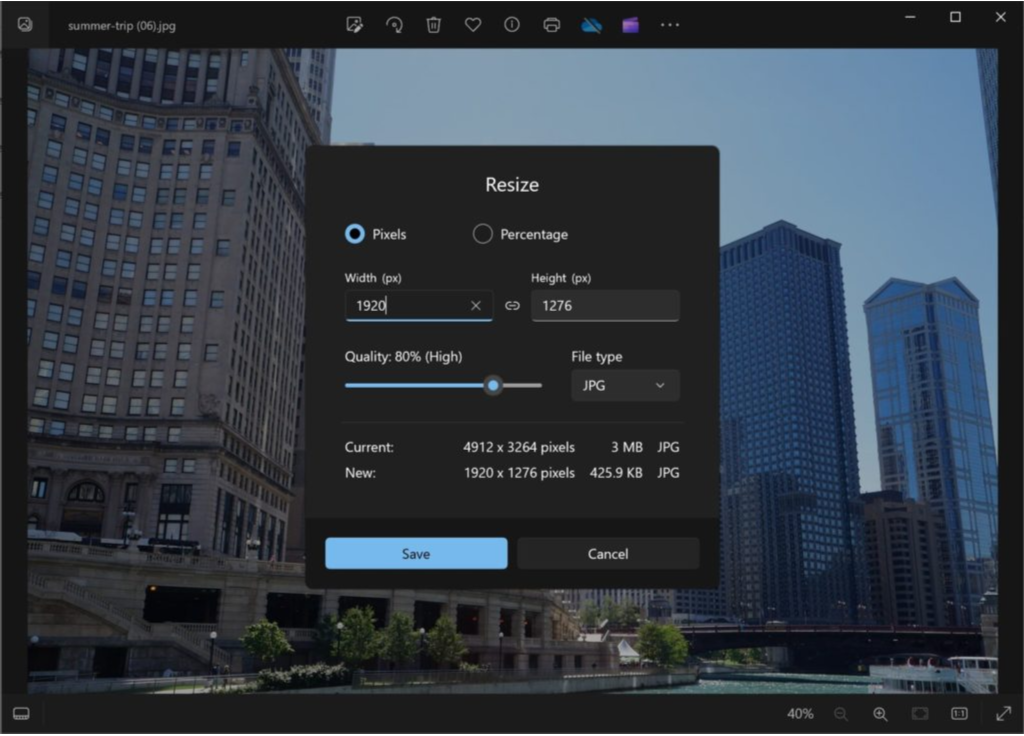
- Open the image using a built-in tool such as Windows Photos, Paint, or Mac Preview.
- Select the resize option and adjust the width and height based on your requirement.
- Maintain aspect ratio to keep proportions consistent and avoid distortion.
- Save the resized image and review the updated file size.
Adjust Image Quality (Compression Level)
If you need more control over file size without changing image dimensions, you can adjust the compression level while saving the image. JPEG allows you to control how much data is retained during export, which directly impacts both file size and visual clarity.
Let’s take a practical example.
You have a 5 MB JPEG image captured from a camera. The image looks sharp and detailed, but the file feels too heavy for web upload or sharing. You open the image in a built-in editor and choose the save or export option. During this step, you get a quality slider or percentage setting.
Set the quality to 100%, and the file remains almost the same in size. Reduce it to 80%, and the file size drops significantly while the image still looks visually sharp, which aligns with common JPEG quality optimization benchmarks where 70–80% delivers the best balance between size and clarity.
Bring it down further to 60%, and the file size reduces more, although slight softness may appear in fine details. In fact, once compression drops below 75%, visible artifacts start appearing, especially in textured or high-contrast areas.
So, the goal is really simple: you need to adjust the compression level until you reach a balance between size and clarity, which helps achieve high quality image compression without unnecessary data.
Just to be clear, you can use this image compression method as follows:
- Open the image in a tool such as Windows Photos, Paint, or Mac Preview.
- Select “Save As” or “Export” to access quality settings.
- Adjust the quality percentage using the slider provided.
- Preview the output and check file size changes.
- Save the image once the desired balance is achieved.
Crop Unnecessary Areas from the Image
In case the image contains extra space or irrelevant sections, you can crop the image to reduce file size while improving composition. Image size depends on how much visual data is present. If you remove the unused portions directly, it reduces the amount of data stored in the file.
Keep in mind that image cropping works differently from compression level adjustment. Instead of reducing quality, cropping removes unnecessary content. So, important details stay sharp while excess data gets eliminated, which helps reduce JPEG file size without losing quality.
Now, follow a simple approach to apply this manual image compression method.
- Open the image in a tool such as Windows Photos, Paint, or Mac Preview.
- Select the crop option from the editing menu.
- Adjust the frame to keep only the required subject or content.
- Remove extra background, margins, or unused areas.
- Save the cropped image and check the reduced file size.
For instance, you have a 4 MB JPEG image with a subject placed in the center and large empty background areas around it. The background does not add value to the image. You can open the image in an editor and crop out the extra space. The file size drops immediately because fewer pixels remain in the final image. Got it?
Use cropping in scenarios such as:
- removing large empty backgrounds from photos
- focusing on a specific subject or object
- preparing images for thumbnails or profile use
- optimizing product images for ecommerce listings
In fact, cropping improves both file size and visual focus. The image becomes lighter and more meaningful, which makes it easier to use across web, storage, and sharing platforms.
Quick Tip: If allowed, you can convert from PNG to JPEG or from JPEG to a more efficient format like WebP to reduce JPEG file size without losing quality.
Do You Want to Compress JPEG to an Exact File Size?
There are times when a general compression approach does not meet the requirement. Upload portals, forms, and platforms often define strict file size limits, so you need precise control instead of trial-based adjustment. In such cases, you can rely on size-targeted tools to reduce JPEG file size without losing quality while matching exact limits.
We also feature a range of size-targeted tools, such as image to 20KB, JPEG to 50KB, JPEG to 100KB, and JPEG to 200KB, to help you achieve accurate output without repeated effort.
- 20KB → Suitable for government forms, ID uploads, and strict verification portals that require very small file sizes.
- 50KB → Ideal for profile pictures, basic submissions, and platforms with moderate upload limits.
- 100KB → Works well for websites, blogs, and general online uploads where a balance between clarity and size is required.
- 200KB → Suitable for higher-quality images used in presentations, ecommerce listings, and content publishing.
Each image compression tool applies controlled compression to meet the exact target size while preserving visual clarity. So, instead of adjusting compression multiple times, you can directly select the required size and get a ready-to-use image in one step.
In fact, this approach simplifies workflows that demand precision. You can easily define the size, and the system handles optimization intelligently to maintain quality while achieving the required output.
How to Choose the Right JPEG Compression Method?
Always start with your requirement, not the method. Image purpose, file size limit, and quality expectations decide which approach fits best.
- Identify the purpose of the image. Web usage, email sharing, and storage optimization require different levels of compression and quality control.
- Check file size limits before starting. Platforms with strict limits require precise control to reduce JPEG file size without losing quality, without repeated trials.
- Make sure the compression tool or method applies a controlled lossy process, since JPEG relies on lossy compression to achieve size reduction.
- Evaluate control requirements. Manual methods allow detailed adjustments for high quality image compression, while automated tools handle optimization faster with consistent output.
- Consider whether the exact file size is required. Size-targeted workflows need precise adjustment rather than general compression.
- Look for adaptive compression capability. A reliable system analyzes image structure and applies different compression levels across areas to maintain visual clarity.
- Ensure preview and output validation. The ability to review file size and visual quality before downloading helps confirm proper optimization.
- Check support for batch processing if multiple images need compression. It should have a bulk JPEG compressor capability.
Keep in mind that a reliable image compression method combines intelligent compression, control options, and consistent output to deliver optimized images without compromising quality.
Best Practices for Maintaining Image Quality During Compression
| Practice | What You Should Do | Why It Matters |
|---|---|---|
| Use a High-Quality Source Image | Work with a clear, high-resolution JPEG before compression | Higher initial detail provides more compression headroom and better retention after Discrete Cosine Transform (DCT) and quantization |
| Choose the Right Compression Level | Keep quality around 70–85% for most use-cases | Balanced quantization reduces file size while maintaining perceptual clarity and limiting visible JPEG artifacts |
| Control Quantization Strength | Adjust compression quality settings carefully based on output requirements | Quantization strength determines how much high-frequency detail is removed and how visible artifacts such as blockiness, banding, ringing, and compression appear |
| Resize Before Compressing | Adjust image dimensions based on actual usage | Lower pixel count reduces data before DCT processing and improves overall compression efficiency |
| Avoid Repeated Compression | Always work from the original JPEG file for adjustments | Repeated quantization cycles cause generation loss and increase visible artifacts over time |
| Crop Unnecessary Areas | Remove extra background or unused sections | Fewer pixels reduce encoded data while keeping important visual content intact |
| Maintain Aspect Ratio | Keep width and height proportions consistent | Preserves image structure and prevents distortion during resizing |
| Use Preview Before Download | Review output clarity and file size before saving | Validates visual output after quantization and encoding stages |
| Use Appropriate Chroma Subsampling | Apply suitable chroma subsampling during compression | Reduces color data based on human visual sensitivity while preserving perceptual clarity |
| Control Detail in Complex Images | Apply moderate compression to images with textures and gradients | High-frequency regions are more sensitive to quantization and show artifacts more quickly |
Final Words: Compress JPEG Images Efficiently With the Right Tool
Now, it should be clear that the best ways to compress a JPEG image include using an image compressor, resizing image dimensions, adjusting the compression level, cropping unnecessary areas, and converting formats when allowed. Each method helps reduce JPEG file size without losing quality based on the situation and level of control required.
However, it is always better to rely on a powerful image compressor tool that handles compression with precision and consistency. Only a smart compression tool helps you compress and preserve quality without going through repeated adjustments or manual effort.
Go ahead and try our free image compression tool to shrink JPEG file size online and get optimized images ready for web, storage, or sharing within seconds.